Chapter 8: Visualizing our future home
In which we throw all of the technology at the problem

Where we left off: With the biggest design decisions made, we wanted to (virtually) try before we buy.
This post written by Ben with editing and commentary from Mindy. Note that your email provider my clip the message, so make sure you get to the video at the end, or view this post on Substack.
Imagining what’s to come
Now that we had a general design for the home and the land to put it on, we could start to dial in how it would all come together. But to complete the picture we needed two things:
Some way of visualizing the interiors of the home
Some way of visualizing the home on the property (trees, hills, and all)
In a funny way, my whole life has been leading up to this moment.
When I was a child, my parents sent me to a week-long summer science camp. I think I was around five or six at the time, recently having completed kindergarten. I honestly don’t remember what we spent most of the week doing. But on Wednesday, the camp counselors brought us to a computer lab and set us down in front of computers with a BASIC (programming language) file open.
They had exercises for us which involved typing code from a printout into a computer and running it. One program would ask you your name and then say “Hello [NAME]!” Another was a program that drew a few shapes at specified coordinates, in this case a house.
Evidently I was a faster typist than my peers, so I had extra time left over. I surmised that the numbers in the house program controlled where the shapes were drawn. I tried changing some of the numbers and hit run and my formerly orderly house was now Picasso’ed, a veritable mess of random shapes that only retained a faint resemblance to a normal home.
“This is amazing,” I thought, “I want to do this for the rest of my life.”
It was clear to me then that a computer was the ultimate imagination machine. The number of different images a computer with a modest amount of electricity can display was greater than the number of atoms in the universe. With software, I could paint any future I wanted without ever touching a paintbrush.
This initial experience with computer drawing lead me to an early obsession with 3D modeling and photorealistic rendering in the hopes we could one day inhabit those creations in VR. I used whatever software I could get my hands on to model out all sorts of random things.
In fact, I unintentionally won my middle school district’s art photography contest with a landscape rendering done in Terragen (I submitted it to a computer art category, but they got confused—I wasn’t trying to cheat).
Mindy’s commentary: Childhood humble brag—but it’s warranted! As you might imagine (and as confirmed by his parents), Ben was a precocious child.
This fascination with pixels continued into my career, first with Yelp Monocle adding a layer of pixels to the real world to help you find tasty bites. Then came bubbli which gave you a window into a “virtual reality” that was in fact a real reality captured elsewhere else.
Now designing our home, I had an opportunity to combine all of this to imagine what our future together might look like.
Digitizing our home
There are a ton of different tools to do architectural modeling, the ones you’ve probably heard of are SketchUp and AutoCAD.
SketchUp is medium affordable for hobbyists so I signed up for a trial and began modeling the home based on the floor plans from our architects. They had some renderings done in AutoCAD, but I wanted models I could interact with in 3D, so we could truly feel like we were walking through our future home.
After learning how to operate SketchUp, I pretty quickly had a fairly accurate model of the home:

One of the reasons I chose to use SketchUp was because it has a VR mode built-in.
To the surprise of no one, I own a lot of VR equipment, and I quickly put Mindy in a headset and handed her controllers to virtually walk around the home and get a sense of scale.
This experience was really compelling. The VR feature itself was an afterthought for SketchUp but made a huge difference in our ability to visualize ourselves in the space. Before we were interpreting floor plans. Now we could stand inside them and understand with greater accuracy what it’d be like to live there.
But SketchUp also has an augmented reality (AR) feature built in that uses ARKit to view a model pinned to the real world. It’s intended to be used for table-top scale exploration but I thought — why not try it at human scale?
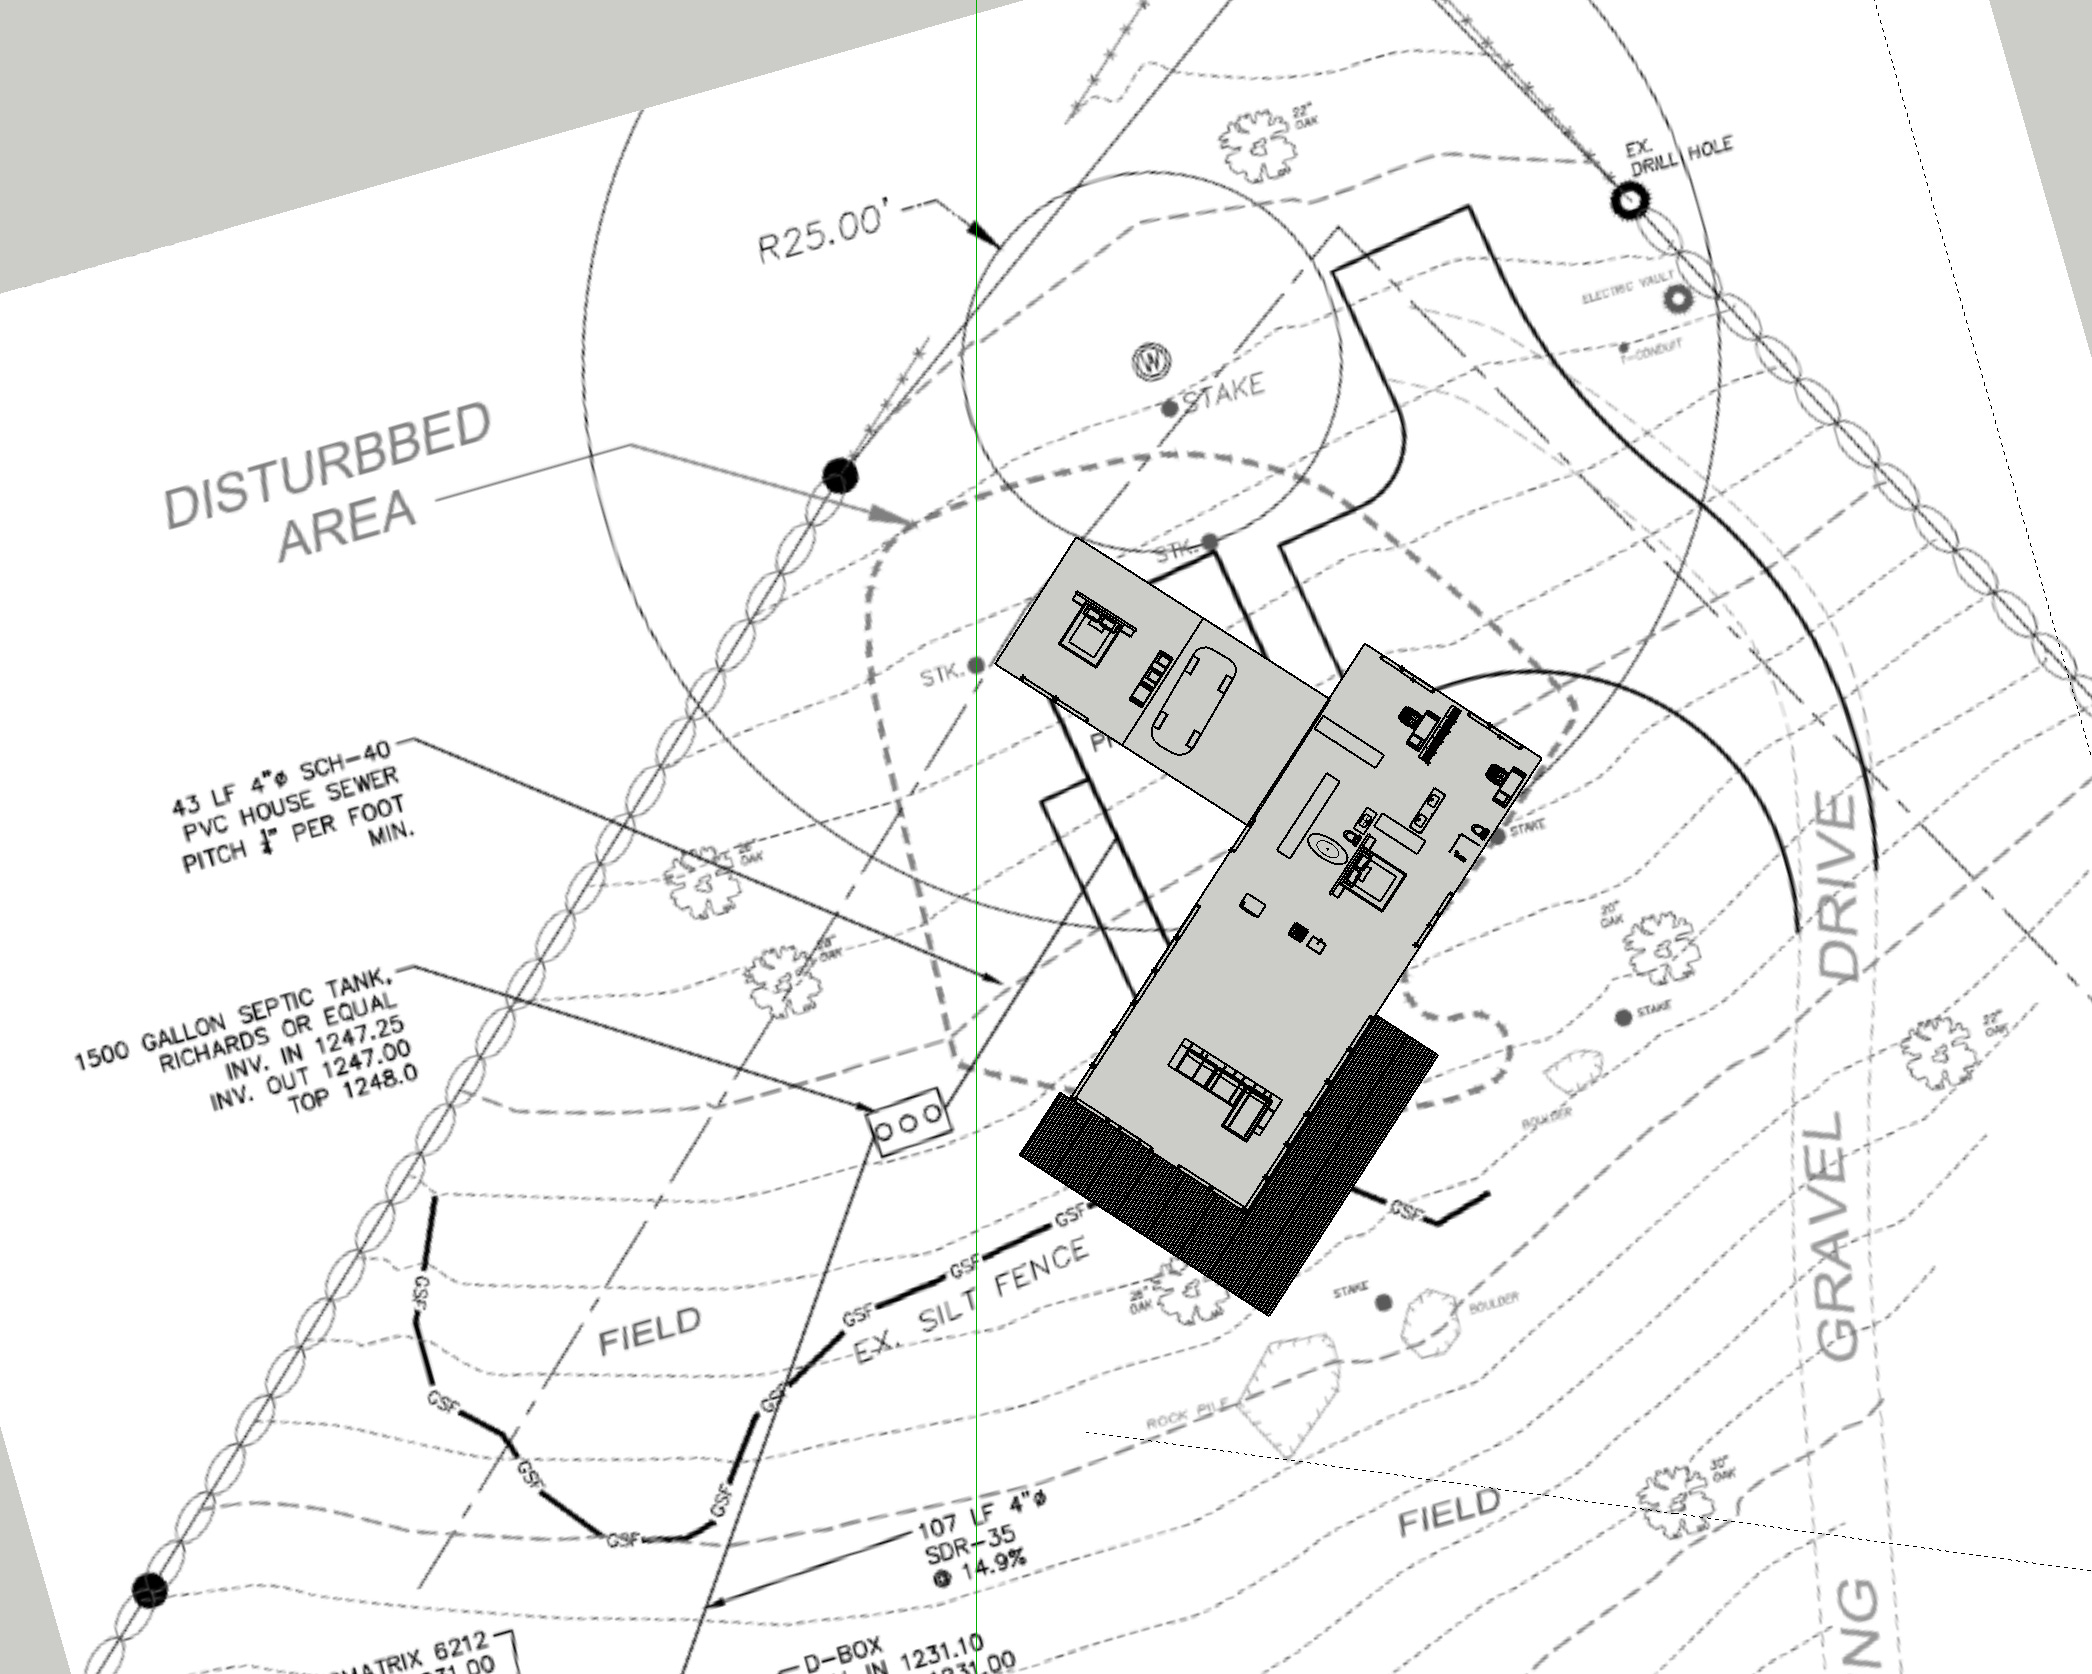
I put the model on a scaled up survey (read: map of the property) marked a few waypoints that I could use to position the 1:1 model in real life and drove up to the site:


This worked better than expected. Tracking was good enough for me to more or less “walk” all the way through the house, down the hallway and into the offices.
Mindy’s commentary: Imagine that you’re about to put down a bunch of money on a home without ever stepping foot in it. That’s what we would’ve done without Ben’s VR modeling. I had much greater peace of mind walking around the home in the VR headset before locking our designs with the architecture firm.
Digitizing Butter Hill
Getting an accurate 3D model of the property itself required a lot more ingenuity. I had purchased a drone earlier on in the land-buying process and mostly used it to assess plots of land from the sky.
Having worked for years on computer vision algorithms to stitch together camera imagery, I was excited to see what the state of the world was for 3D reconstruction from drones.
There are a few different companies that provide solutions for this, as well as a couple of open source projects. Curious to experience the state of the art, I signed up for a trial of Drone Deploy and drove up to the property to launch it into the sky where it followed a pre-determined path.

About half an hour later, the drone returned roughly back to where it took off and began descending. As it got lower and lower, it was clear that it would try to land on top of the car.
No problem, I thought, I specifically bought the higher end drone because it would detect obstacles and “land safely by detecting land.”
However, that appears to only work when the human is in control. When flying a pre-set flight path, Humpty Dumpty (the name of our drone for reasons that will become clear in a future chapter) is gonna do what Humpty Dumpty wants to do. And in this instance, it meant crashing down on the side of the (rental) car propellers scraping against the paint.
Fortunately, I was able to buff out the light scratching (and wasn’t charged for it). Frustrated, I drove home and uploaded the images to Drone Deploy for processing.
An hour or so later, results were complete:

The really neat stuff, however, is the 3D point cloud & model that’s constructed:

While this is extremely cool, it’s not at a fidelity where you could plop a virtually rendered house down and get a first-person sense for how things look on the property.
Instead, I used this capture to extract an elevation model for the ground to then dump into SketchUp. Thus began a five hour journey through terrible GIS (Geographic Information System) software.
First, we need to get the elevation minus the trees. Conveniently, Drone Deploy has some means of detecting trees (either based on discontinuities in elevation or some machine learning) and then removing them.
Using this, it can export an approximate elevation map:

This is cool looking but unfortunately useless in its default format (a TIFF file!). First, there are no defined units of elevation per pixel. Second, it’s designed to be perceptually useful for humans rather than machine readable. You might think to extract the hue here and interpret that as a height, but the hue has been non-linearly mapped to elevation.
So next I tried a contour export. If you’ve seen a topological map for a hike somewhere you might recognize them:
How can we get a 3D model from this? Conceptually, this is a series of curves all 2’ separated in elevation. We need to convert it to triangles (which are the basic building block of 3D models).
The common way to do this is to use an algorithm called Delaunay Triangulation. After cycling through terrible software like QGIS and ArcGIS, I managed to get Blender with a GIS plugin to do exactly this.

With this elevation model we could then place the house on the property and have a sense of how much the elevation shifts from one side of the house to the other—important since we were considering building a walk-out basement.
Next, we needed good imagery for what you see when looking out along the horizon. This is well solved with a skybox rendered “behind” closer objects (note: a skybox is the same thing as a bubbli bubble).
I took a number of photos in a sphere, stitched them into a panorama and edited out a couple trees we’re planning on cutting down.

All the (digital) assets were complete. But before we put everything together, we had to answer one question:
Where will the house actually go on our land plot?
Siting (read: placing) a house on a piece of land is among a class of invisible problems that only seem complicated in retrospect.
How often have you visited a house in the woods and asked to yourself “but why is it here? why not two feet this way? or that way? or rotated ten degrees?”
If you’re like either of us, the answer is probably never.
On multi-acre plots like ours, however, there are a near-infinite number of possible placements. Fortunately (or unfortunately) a number of constraints help narrow them down pretty fast:
Aesthetic Constraints
We have a lot of windows, we’d like the view out of them to be nice.
Zoning Constraints
You have to build a certain amount inside the property lines, depending on zoning and property type. In our case, we needed a “setback” of 30’.
You can’t build within a certain radius of a well, in our case: 25’.
You can’t build within a certain distance of wetlands (read: a stream), not an issue for our property.
You need a place to park and a legal driveway (read: not too steep).
Logistical Constraints
You want to be reasonably close to your well and electricity.
You want to be uphill from your septic system.
You want to make sure water flows away from your house, not into it.
Windows should be south facing to maximize heat from the sun.
Building on flat land is easier than on a hill, but a hill enables a walkout basement that you can finish later and count as square footage.
With these things in mind we started to play around with different configurations of the property.

You’ll note three rectangles here:
The Main House
The Guest House
A Carport / Future Garage in between them.
As we started to model everything out, there were a couple of additional constraints to add.
Namely:
For privacy, we didn’t want the guest house and master bedroom windows to face each other
The best view of rolling hills faced southwest, so we wanted to our living room windows to face that direction
If we went too much against the slope of the hill, we would drop 10+ feet, which is too much for a walk out basement
In the end, we settled on the following:
In this configuration, the guest house and the main living room look down the valley, while our master bedroom looks down the hill in another direction.
Putting It All Together
To see what this really look like, I got to use another fancy piece of technology: real-time raytracing. I discovered a tool called Enscape, which is a plugin for SketchUp and other architectural tools that allows you to render photo-realistic materials, reflections and lighting as you move around the building(s).
It’s really incredible how far this stuff has come since I was a kid.
With all of this, we finally have accurate renderings of our future home mapped against the real terrain and scenery of the site.
Please enjoy:
Up next: Now that we have a vision, will the town actually let us build it?
"How often have you visited a house in the woods and asked to yourself “but why is it here?"
I wonder this all the time! I think you picked a great plot of land and a great spot for the buildings. The rendering video is incredible.
The rendering sets a high bar for the trees and the grass =D. Also... I want to sit in your living room and read a book =D